
 English
 français
 Deutsch
 русский
 italiano
 español
 português
 Nederlands
 العربية
 Türkçe
 Polski
Installing a toilet seat may seem like a simple task, but doing it correctly ensures comfort, safety, and longevity. Whether you're replacing an old, worn-out seat or upgrading to a new style, this step-by-step guide will walk you through everything you need to know.
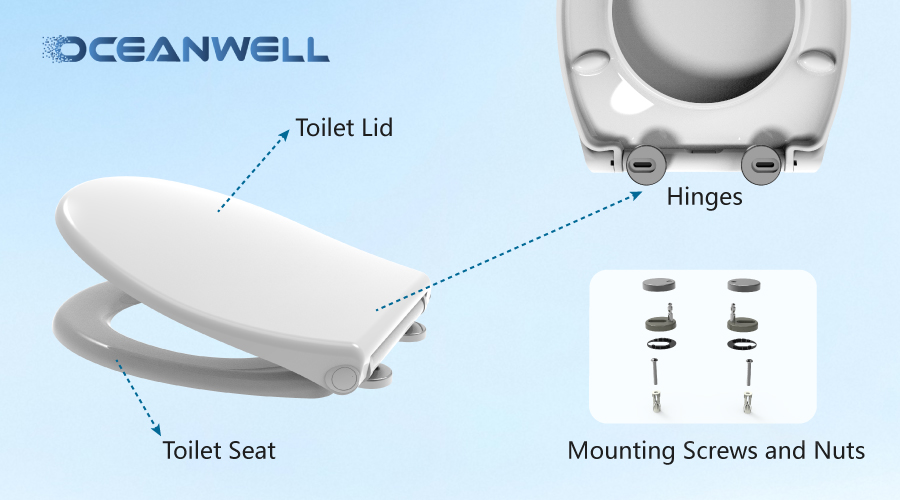
① Understanding the Components of a Toilet Seat
A standard toilet seat assembly consists of several key parts:
- Toilet Seat: The part you sit on, usually made of plastic, wood, or resin.
- Toilet Lid: The cover that closes over the seat, often attached with hinges.
- Hinges: Metal or plastic mechanisms that connect the seat and lid to the toilet bowl, allowing them to lift and lower.
- Mounting Screws and Nuts: These secure the seat to the toilet bowl. They may be visible on top or hidden underneath the bowl.
- Washers: Small rubber or plastic discs that prevent leaks and secure the screws tightly.
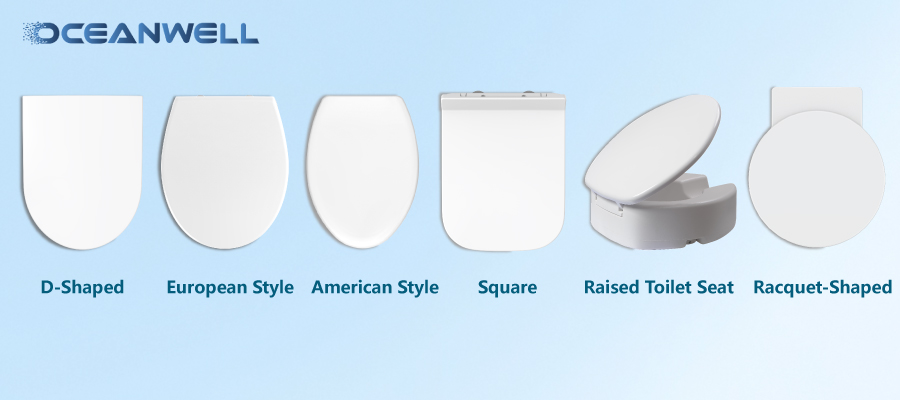
② Shape Classifications
Toilet seats come in various shapes to fit different toilet bowls. The most common include:
- D-Shaped Toilet Seat: Resembles the letter "D," with a straight back and curved front. Popular in modern bathrooms.
- European Style Toilet Seat Cover: Typically more compact and rounded, designed to fit European-standard toilet bowls.
- American Style: Generally larger with a more elongated or oval shape, matching most American toilet models.
- Square Toilet Seat: Features sharp, straight edges for a contemporary look, often paired with square toilet bowls.
- Trapezoidal: Has a slightly tapered shape, wider at the front and narrower at the back.
- Racquet-Shaped: Combines rounded edges with a subtle angular design, similar to a tennis racquet.
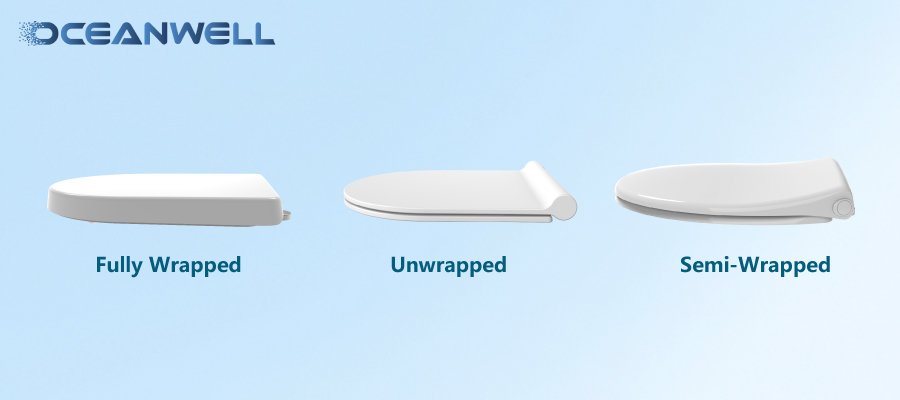
③ Differences Between Unwrapped, Semi-Wrapped, and Fully Wrapped Designs
These terms refer to how the seat covers the toilet bowl's rim:
- Unwrapped: The seat sits directly on the bowl's rim without extending over its edges. It’s simple but may leave more of the bowl exposed.
- Semi-Wrapped: The seat partially covers the front edge of the bowl, offering a balance between coverage and simplicity.
- Fully Wrapped: The seat completely covers the bowl's rim, providing a seamless look and better hygiene by reducing gaps where dirt can accumulate.
④ How to Choose the Right Toilet Seat
Selecting the perfect toilet seat involves considering these factors:
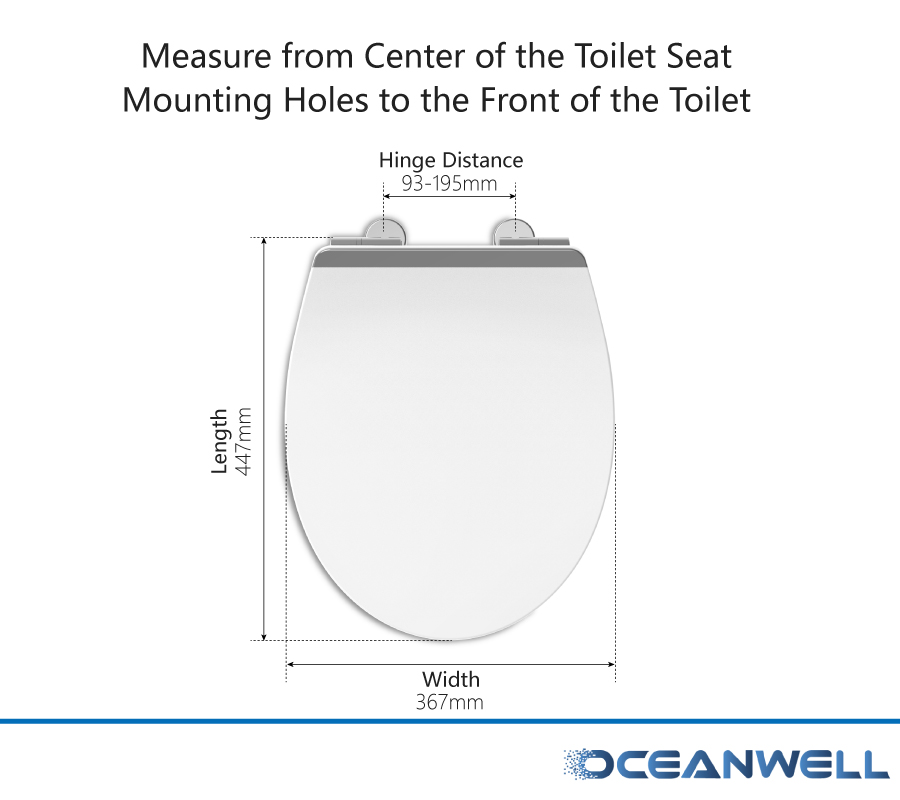
- Measure Your Toilet: Check the length and width of your toilet bowl to ensure a snug fit. Measure from the bolts (where the seat attaches) to the front of the bowl.
- Material: Plastic seats are affordable and easy to clean; wooden seats offer warmth and style; resin seats are durable and resistant to stains.
- Features: Opt for soft-close hinges to prevent slamming, quick-release mechanisms for easy cleaning, or antibacterial materials for added hygiene.
- Style and Color: Match the seat to your bathroom decor. White and off-white are classic, while bold colors or patterns can add a unique touch.
⑤ Essential Tools and Installation Steps
Tools You’ll Need:
- Screwdriver (flathead or Phillips, depending on the screws)
- Adjustable wrench
- Pliers (optional, for stubborn nuts)
- Cleaning cloth
- Mild cleaner
Installation Steps:
1. Remove the Old Seat:
- Locate the mounting screws (either on top of the bowl near the hinges or underneath).
- Unscrew the nuts (you may need to hold the screw from above while turning the nut below).
- Lift off the old seat and lid.
2. Clean the Area:
- Wipe the mounting area with a mild cleaner to remove dirt, grime, and old residue.
3. Align the New Seat:
- Place the new seat on the bowl, ensuring the hinges line up with the mounting holes.
- Insert the screws through the holes (from top to bottom).
4. Secure the Seat:
- Screw the nuts onto the bolts from underneath. Tighten them firmly but not too much to avoid cracking the bowl.
- Check that the seat is level and doesn’t wobble. Adjust if necessary.
5. Test the Seat:
- Lift and lower the seat and lid a few times to ensure they move smoothly and stay in place.
⑥ Daily Care for Your Toilet Seat
- Regular Cleaning: Wipe the seat with a damp cloth and mild soap weekly. For deeper cleaning, use a disinfectant spray or wipes.
- Avoid Harsh Chemicals: Abrasive cleaners or bleach can damage the seat’s finish over time.
- Check for Loose Screws: Tighten the mounting screws periodically to prevent wobbling.
- Handle with Care: Avoid slamming the lid, even with soft-close hinges, to extend their lifespan.
By following these steps and selecting a seat that fits your needs, you’ll enjoy a more comfortable, hygienic, and visually appealing bathroom. For advanced options, consider smart toilet seats with heated surfaces or bidet functions—just ensure they’re compatible with your bowl’s dimensions.


 No. 33 Shishan North Road, Dongfu Street, Dongfu Town, Haicang Dist., Xiamen,Fujian, China
 +86 13605038522
 +86-592-5685085 ext.8010
 sales08@oceanwellxm.com
 +86 13605038522
 IPv6 network supported